


There are a ton of different puzzles in Hogwarts Legacy and some of them can be pretty tricky. If you don't want to puzzle around for a long time in the game, we will help you find the solutions to every kind of puzzle in the game.
Hogwarts Legacy is filled with a variety of puzzles and hidden secrets located throughout its many locations, including the iconic Hogwarts Castle. With so many challenging and intricate puzzles to solve, it can be difficult to know where to start. That's why we provide a comprehensive overview of all puzzle types in the game, explaining how they work and what to look for in order to solve them.
Hogwarts Legacy Multiplayer & Co-Op: Will The Harry Potter RPG Have An Online Mode?
All Puzzles In Hogwarts Legacy
Keep in mind that many of the puzzles require spells, that can only be obtained by completing Main Quests and Assignments. As you progress through the game, more spells become available to you, allowing you to solve more and more puzzles. Additionally, there are also unique puzzles specific to Side Quests that only appear once.
Animal Symbol Doors
These math puzzle doors are found frequently in Hogwarts Castle. Interact with the door to reveal the puzzle. We have a full guide on how to complete the puzzle here.
Daedalian Keys
In Hogwarts Legacy, you will encounter sixteen flying keys scattered throughout the castle. Get them! To earn a house token, you must catch these keys and place them in their respective keyholes. Once you've collected all sixteen tokens, you can return to your common room to unlock a special reward from the house chest.
Hogwarts Legacy: How To Unlock The Unforgivable Curses Avada Kedavra, Crucio & Imperio
To begin your quest to find the flying keys, you must speak to Nellie Oggspire in the Transfiguration Courtyard. Keep in mind that not all of the Daedalian Keys will be accessible until the Autumn term, when you unlock the Alohomora spell during the "The Caretaker's Lunar Lament" quest. This spell grants you access to previously blocked-off areas like the Faculty Tower and upper Clock Tower.
When you spot a flying key, simply follow it back to its cabinet, where it will hover above the keyhole. You can then interact with it to start a minigame, where you must successfully place the key in the lock to earn your house token.
Eye Chests
Cast the spell Disillusionment (makes you invisible) to avoid getting spotted and get their reward. Here's a detailed guide about the chests.
Depulso Puzzles
The "Heriodana Hall" puzzles are unlocked after completing the side quest of the same name. The objective of these puzzles is to use the spells Depulso or Accio to move blocks in the room and create a path to the opposite side. However, once the blocks come into contact with each other, they become connected and cannot be separated. If you fail to solve the puzzle, you have the option to reset it and try again.
Locked Doors (Level 1-3 Locks) & Alohomora Puzzles
To open locked doors in Hogwarts Legacy, you need to complete the Main Quest "The Caretaker's Lunar Lament" to learn the Alohomora spell, which can unlock Level 1 locks. To unlock Level 2 and Level 3 locks, you must complete the Side Quest "The Man Behind the Moons" and gather Demiguise Statues. After collecting 9 Statues, you will be able to unlock Level 2 locks and continuing with the search for statues, after 22 Statues you will unlock Level 3 locks. Return them to Gladwin Moon, who will then teach you more powerful variants of the spell Alohomora.
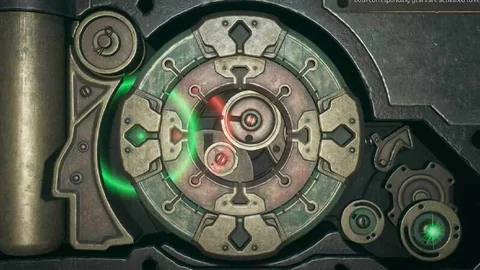
To open the lock, approach the door and interact with it to cast Alohomora. This triggers a lock-picking mini-game where you control two sparks: a green spark using the left thumbstick and a red spark using the right thumbstick. The objective is to move the thumbsticks to the right positions, indicated by the lock mechanism in the bottom right of the lock for the green spark and at the center for the red spark. When the mechanism starts moving and turns green for the green spark and red for the red spark, hold the thumbsticks in place until the lock releases.
It is recommended to start with the green spark and push the left thumbstick to the left or right, then slowly rotate it in a circular motion until you find the spot where the mechanism starts moving and turns green. Then, do the same for the red spark using the right thumbstick until the mechanism at the lock's center starts jittering and turning red. Hold both thumbsticks until the lock is unlocked.
Clock Tower Hogwarts Secret Puzzle
To complete this puzzle, you will need to use the Arresto Momentum spell, which you can obtain by finishing Madam Kogawa's Assignment 2.
Once you have this spell, go to the Clock Tower, which is located in the South Wing of Hogwarts. If you have been exploring the game, you should already be familiar with this location as it is the home of the Crossed Wands Dueling Club.
To solve this puzzle, the player must time their use of the Arresto Momentum spell to stop the pendulum at the right moment, when the metal gate is open. This will allow them to access the door and continue deeper into the Clock Tower.
Here's what you need to do:
- Wait for the pendulum to swing back and forth several times to get a sense of the timing.
- As the pendulum swings, use Arresto Momentum to slow it down when the metal gate is open.
- Quickly pass through the open gate before the pendulum starts moving again.
- Repeat this process for the other three doors in the Clock Tower, each with its own timed metal gate.
Note that the pendulum’s speed and timing will change with each door, so be prepared for a new challenge each time. With practice, however, you’ll soon be able to solve this puzzle with ease.
Each door has its own set of symbols, and the objective is to stop the pendulum so that it passes through the symbols that match the door you are trying to open.
To stop the pendulum, players will need to cast Arresto Momentum on the pendulum when it is in the right position. Timing is crucial, as the pendulum will continue to swing even after being slowed down, and the gate will only open for a brief moment.
Once players have unlocked all four doors, they will be able to access the chest located in the center of the Clock Tower, which contains valuable rewards and house tokens.
Remember, as with any puzzle in Hogwarts Legacy, persistence is key! Keep trying until you figure out the correct timing, and don’t be afraid to try a different approach.
It's worth noting that it takes a bit of trial and error to get the timing right for each door, so don't be discouraged if it takes a few tries. Just keep an eye on the pendulum’s movement and try again when it reaches the correct symbol for the desired door. Also, keep in mind that you may need to recast Arresto Momentum a few times to keep the pendulum from swinging again. Once the pendulum has been stopped, players should have enough time to access the door and grab the reward before it starts swinging again.
Rewards:
- First door: Random Legendary gear piece
- Second door: Fwooper Statue conjuration
- Third door: Disillusionment chest (500 Galleons)
- Fourth door: Huge Decorated Table conjuration
The Headmaster’s Key / Key Of Admittance Puzzle
To finish this mystery, you need to have Alohomora 3 unlocked so that you can open Level 3 locks. Continue through the main story quest to reach the Headmaster's Office, which is only accessible during the Winter season.
The Headmaster's Office is at the top of the Grand Staircase and above the Trophy Room. Once you enter the Headmaster's Office, go to the door on the left which will lead you to an outdoor walkway. Climb the stairs to another locked door which you'll have to open to access a small office. Entering this room will give you the "Room With A View" trophy.
Get the "Key of Admittance" from the desk and then go back down to the entrance of the Headmaster's Office. You'll see a door with a large lock. Unlocking this door will complete the secret challenge and you'll find a Legendary Chest and two Collection Chests.
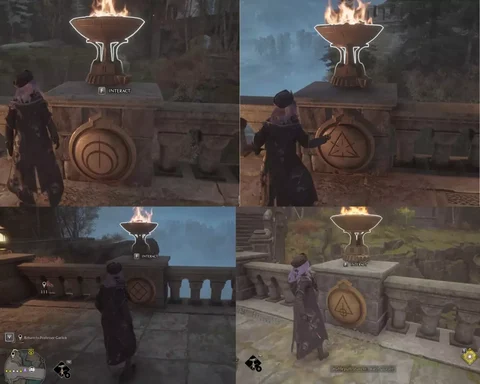
Viaduct Courtyard Bridge puzzle
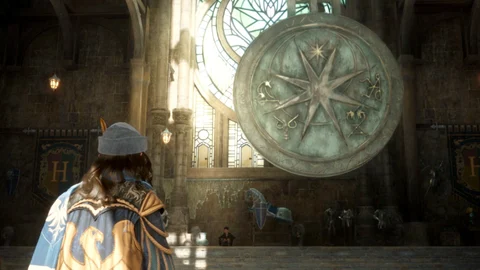
Upon reaching the bridge, you will see two braziers on either side. Three of the braziers are not lit, so you will need to use a Fire spell, such as Incendio, to ignite them. Once lit, go to the opposite side of the bridge from the Viaduct Courtyard Floo Flame. Here you will see symbols on the ground with Roman numerals associated with each symbol, which serves as the solution to the puzzle.
The Symbols and their numeral are:
- Triangle with 6 lines through it: I (1)
- Moon shape with 1 line through it: II (2)
- Triangle with a bullseye: III (3)
- Diamond with an X through it: IV (4)
The objective is to arrange the symbols in the correct order. To do this, you need to remember the sequence of the lit braziers. Start at the first lit brazier and then match the symbol with the corresponding Roman numeral. Then, move on to the next lit brazier and match the next symbol, and so on. Repeat this process until all the symbols are matched with the correct Roman numeral in the correct order. Once you have arranged the symbols correctly, a hidden door should reveal itself, granting you access to the reward behind it.
If you still find it difficult, you can watch this short video for help:
Six Secret Passages and Hidden rooms
Here is a video for all the hidden places you may have missed:
In addition there are after the completion of the side quest "Solved by the Bell". A wall that pulls you in. To pass this wall, you need to cast the spell "Arresto Momentum". This will freeze the wall and allow you to walk past it, revealing the secret.
Merlin Trial Puzzles
The tricky Merlin tasks and how to solve them. Hogwarts Legacy is filled with spell-based trials known as the Merlin Trials. These trials are an important part of the game, as they give you extra inventory slots for carrying more items.
You first encounter the Merlin Trials during the "Trials of Merlin" quest after meeting Natty near Lower Hogsfield. Nora Treadwell will guide you on the process of placing Mallowsweet on the altar and solving the trial. However, there are different types of trials in the game world, each requiring a different spell to solve. Here is a guide on how to complete each type of trial and how to obtain enough Mallowsweet to start them.
There are nine different kinds. Here are the different types of Merlin Trials:
- Rock with a Glowing Gem inside: To solve this puzzle, you must use the Lumos spell to attract moths and bring them to the crystals to light them up.
- Light Pillars: you must use the Confringo spell to light up three pillars. It's recommended to start with the tallest one and use your broom to travel between them as you have only 15 seconds to light up all three.
- the Standing Stones: jump across platforms to complete the challenge
- the Sockets in the Ground: use the Accio spell to pull balls toward you until they are in the sockets
- Exploding Stones: use the Confringo spell to blow out stones
- Repair Statues: use the Reparo spell to repair statues
- The Glowing Pieces: use the Reparo spell to put the pieces together
- The Pillars with a Ball: use a simple basic spell to move the ball out from the post
- Cubes with Symbols: use the Flipendo spell to line up the cubes, using the arrows on some cubes as a guide
The Merlin Trials are also distributed over the different areas in the game:
- South Hogwarts
- Hogsmeade Valley
- North Hogwarts
- North Ford Bog
- Hogwarts Valley
- Feldcroft Region
- Forbidden Forest
- South Sea Bog
- Coastal Cavern
- Poidsear Coast
- Marunweem Lake
- Manor Cape
- Cragcroftshire
- Clagmar Coast
If you are looking for a detailed guide, we have ione here for you:
Hogwarts Legacy Merlin Trials Guide: How To Solve The Puzzles
Butterfly Doors
Looking for help on how to open the butterfly doors in the Helm of Urtkot quest in Hogwarts Legacy? We got you!
In the Helm of Urtkot quest in Hogwarts Legacy, players are tasked with finding the witch's tomb to retrieve the helmet. To complete this quest, players must be at least level 12 and have learned the Depulso spell. Upon entering the tomb, players will encounter a magical door with three slots for moths. The puzzle requires players to slot in the three moths into the grooves on the door's surface.
Two moths are already inside, while the third one is near a pedestal. To bring the third moth to the door, players must cast the Lumos spell near it, causing it to follow the illuminated wand. It will start following your illuminated wand. Guide the third butterfly towards the door, and it will enter its slot.
Once the third moth is guided to the door, it will enter its slot and the doors will open.
Wizards Chess: Minigame
To open some of the treasure vaults in the southern regions, such as Clagmar Coast and Cragcroftshire, players must interact with a chessboard within the vault. First, cast the Revelio spell to highlight the chess piece. Then, use the Transformation spell to turn it into a wizard chess piece. To open the vault, players must place the piece on a tile to create a checkmate situation. It's important to note that each piece has its own movement pattern: rooks move only vertically or horizontally, knights move in an L-shape, and bishops move diagonally.
Fool's mate in Hogwarts Legacy from chess